Pages

Wednesday 11 December 2013

The ayes have it!

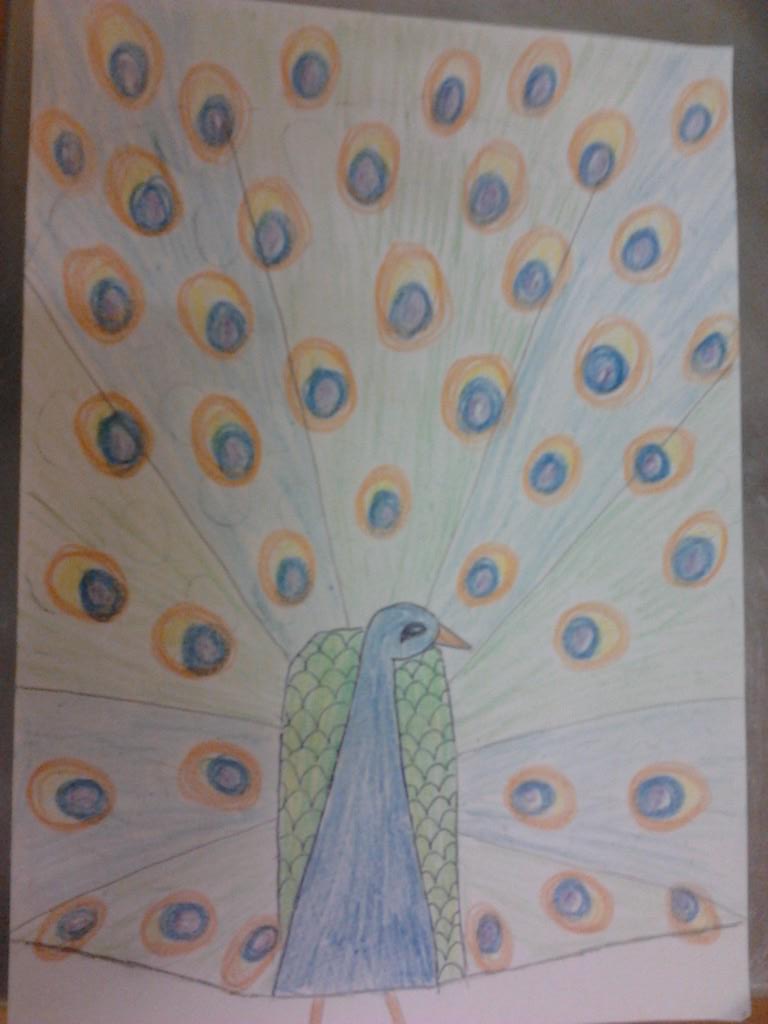
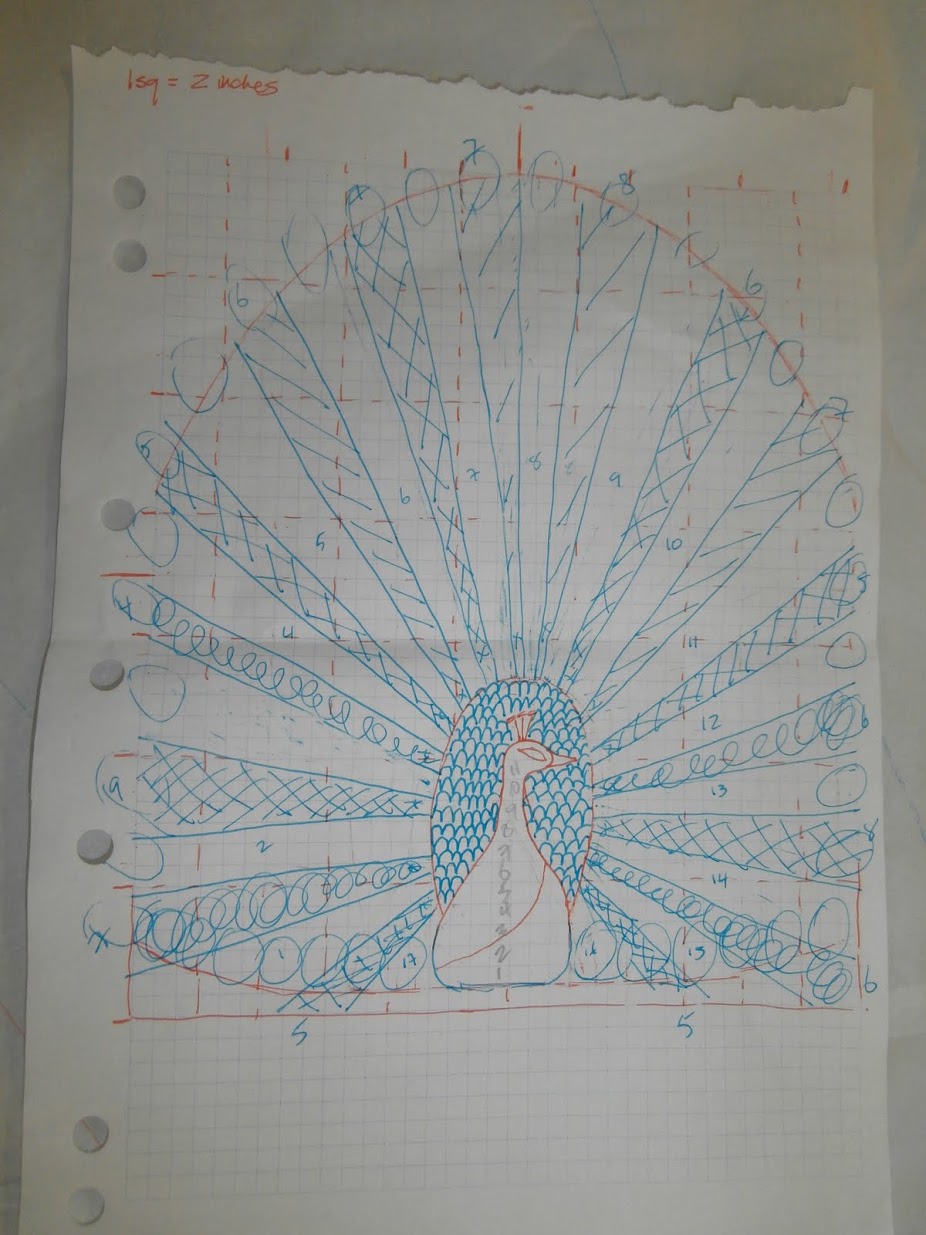
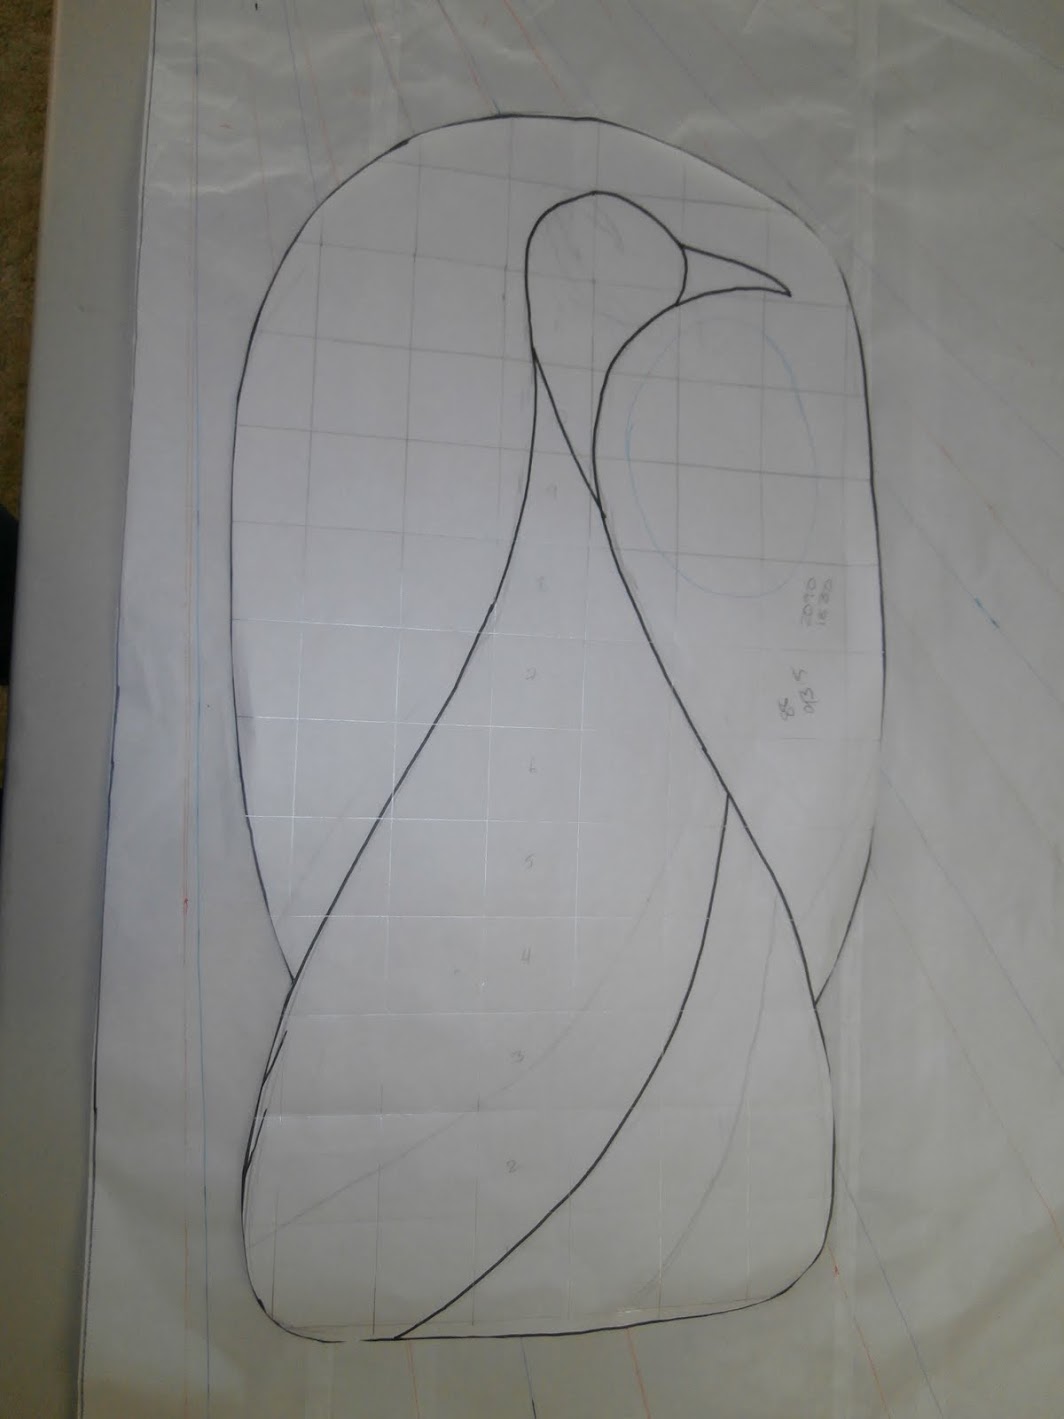
I am nearing the end..... Only four more peacock eyes are left to machine appliqué on the quilt top. This has been a fairly long process, with 54? eyes, with two needleturn fabrics and two machine appliqued fabrics on each eye. I've done the needleturn appliqué on the short train ride to and from work.

Once I've finished those, I need to put some garnish on the top of the peacock head and do something about an eye. Lots of options there, although I haven't yet decided what to do.


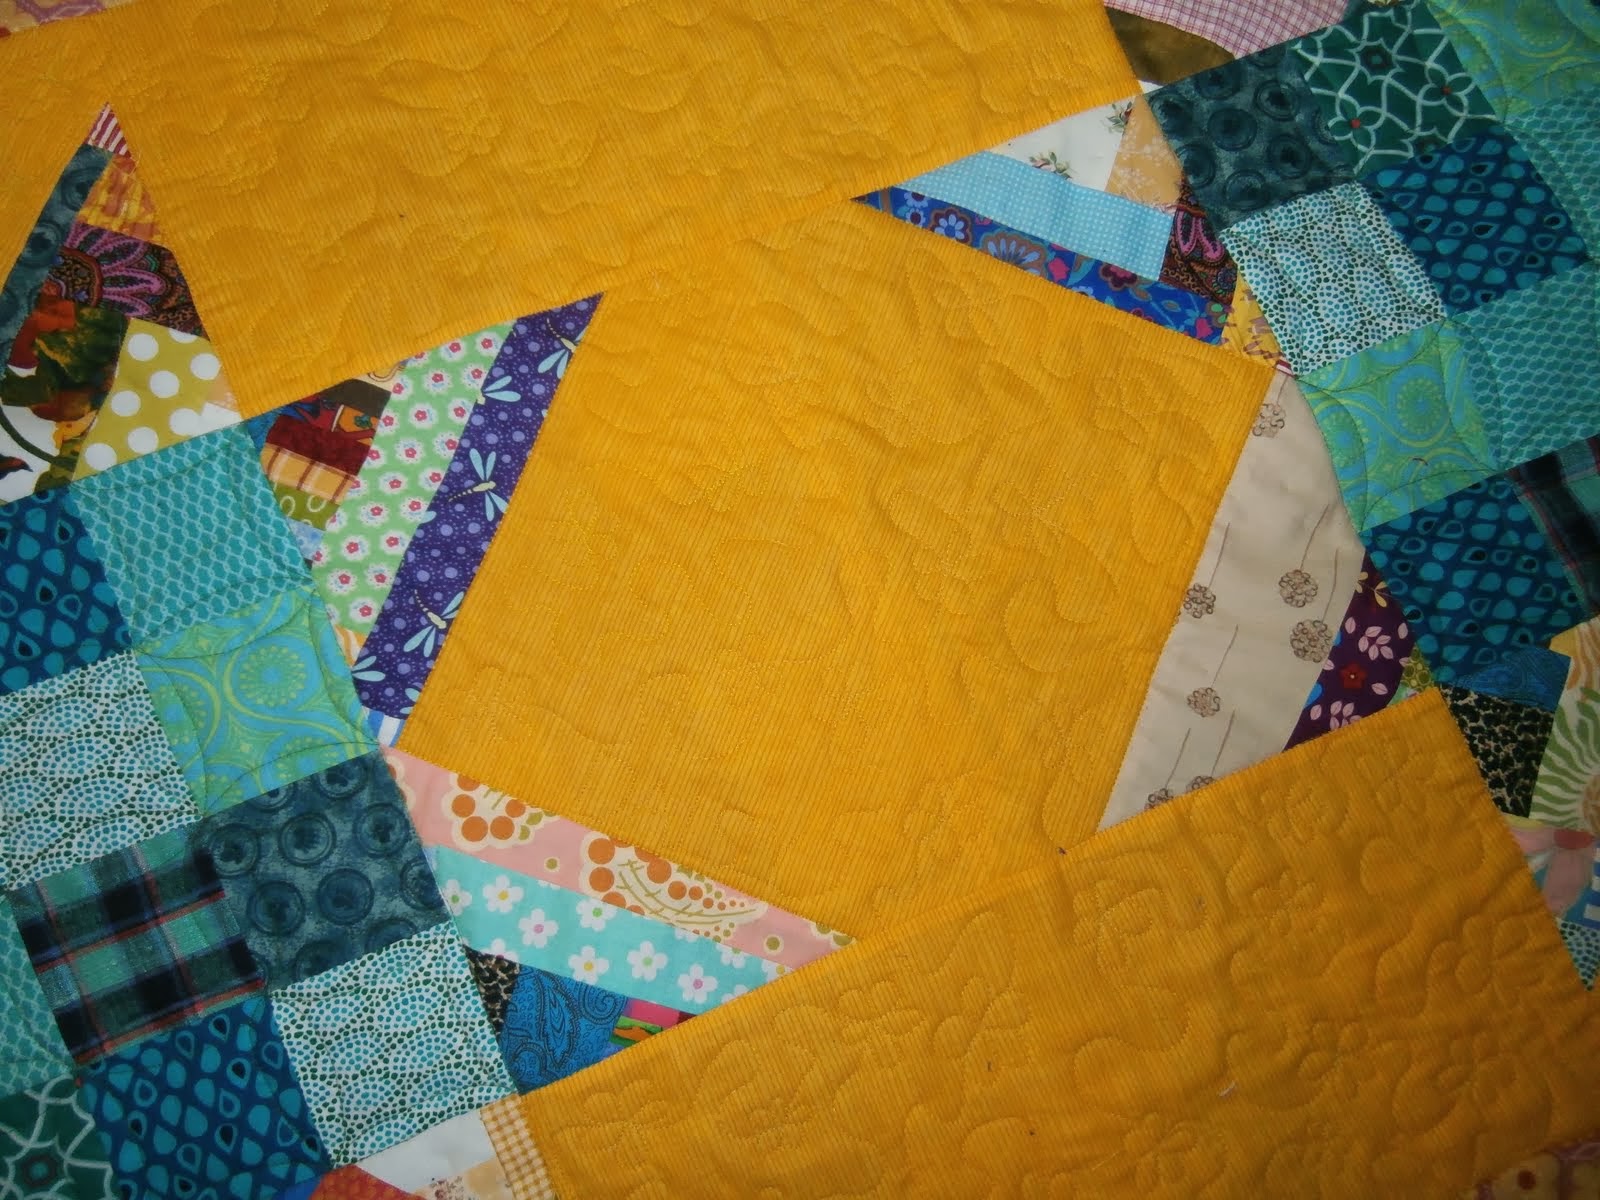
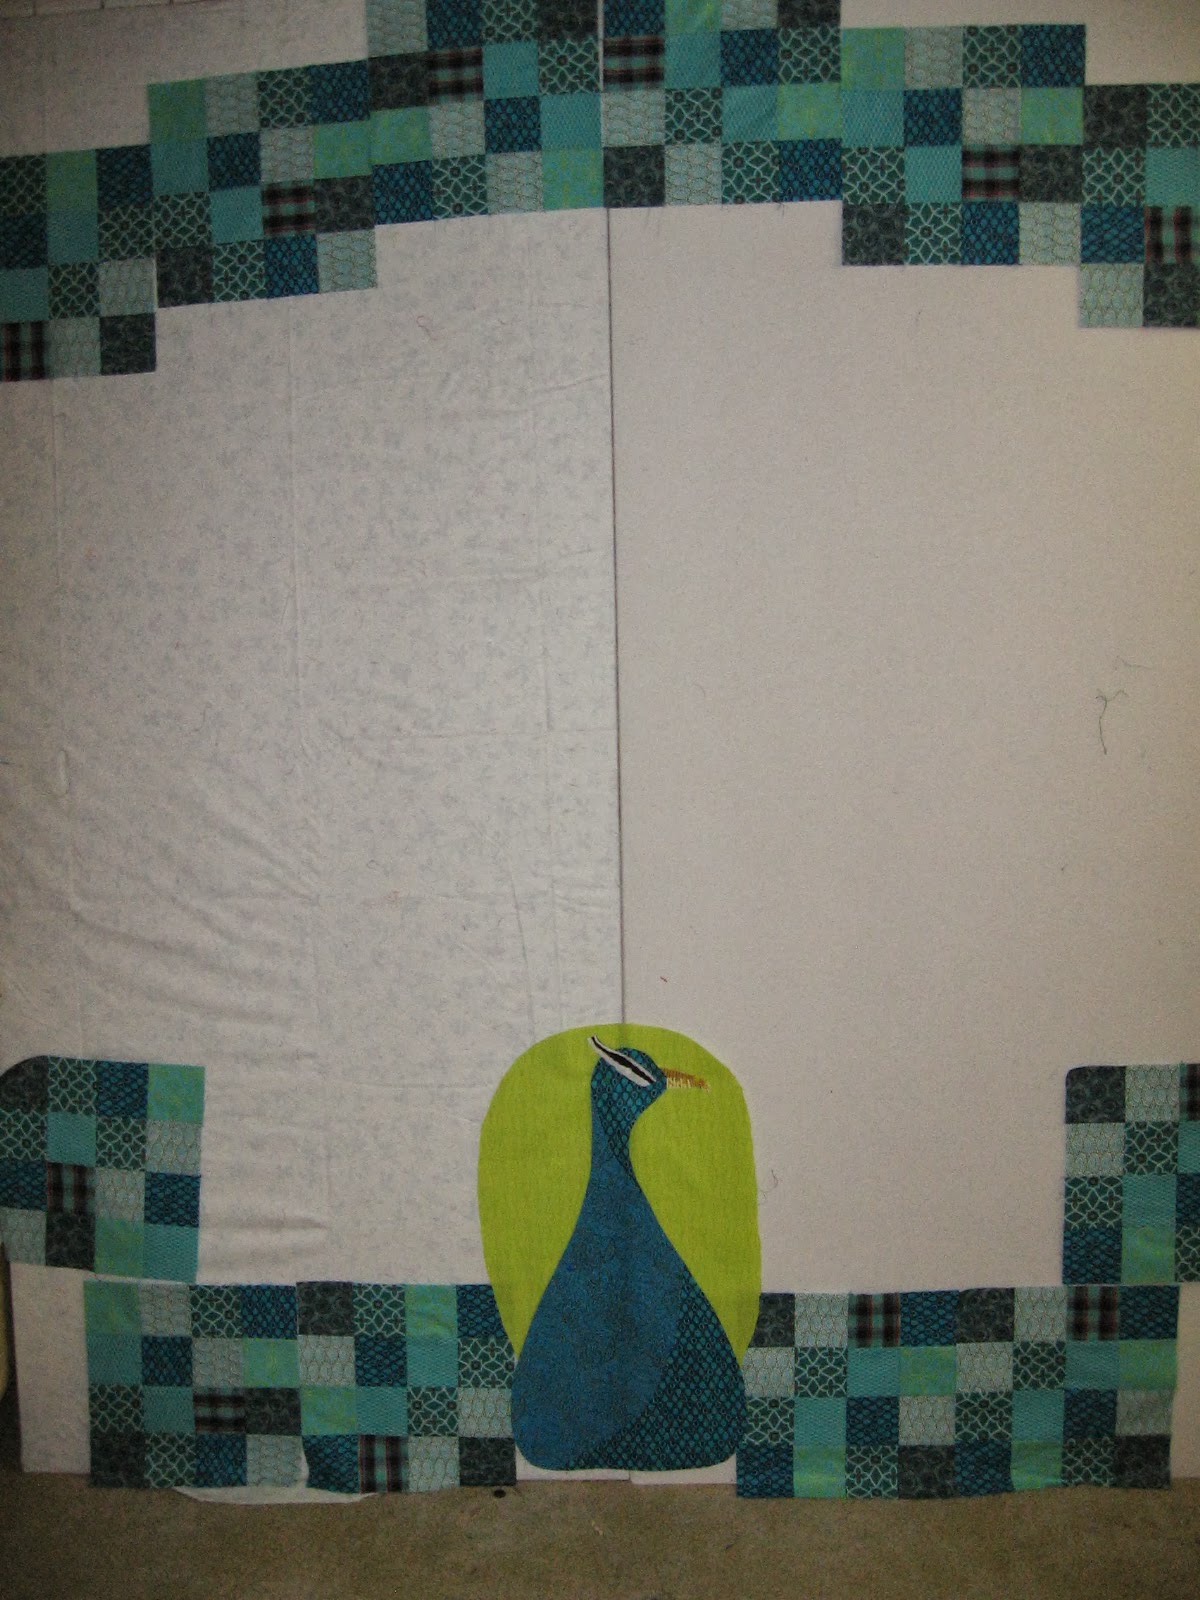
I've also finished the backing for the quilt. I did want to create stars in the cornerstones, but ended up making plain cornerstones as I think this quilt has taken enough of my time.


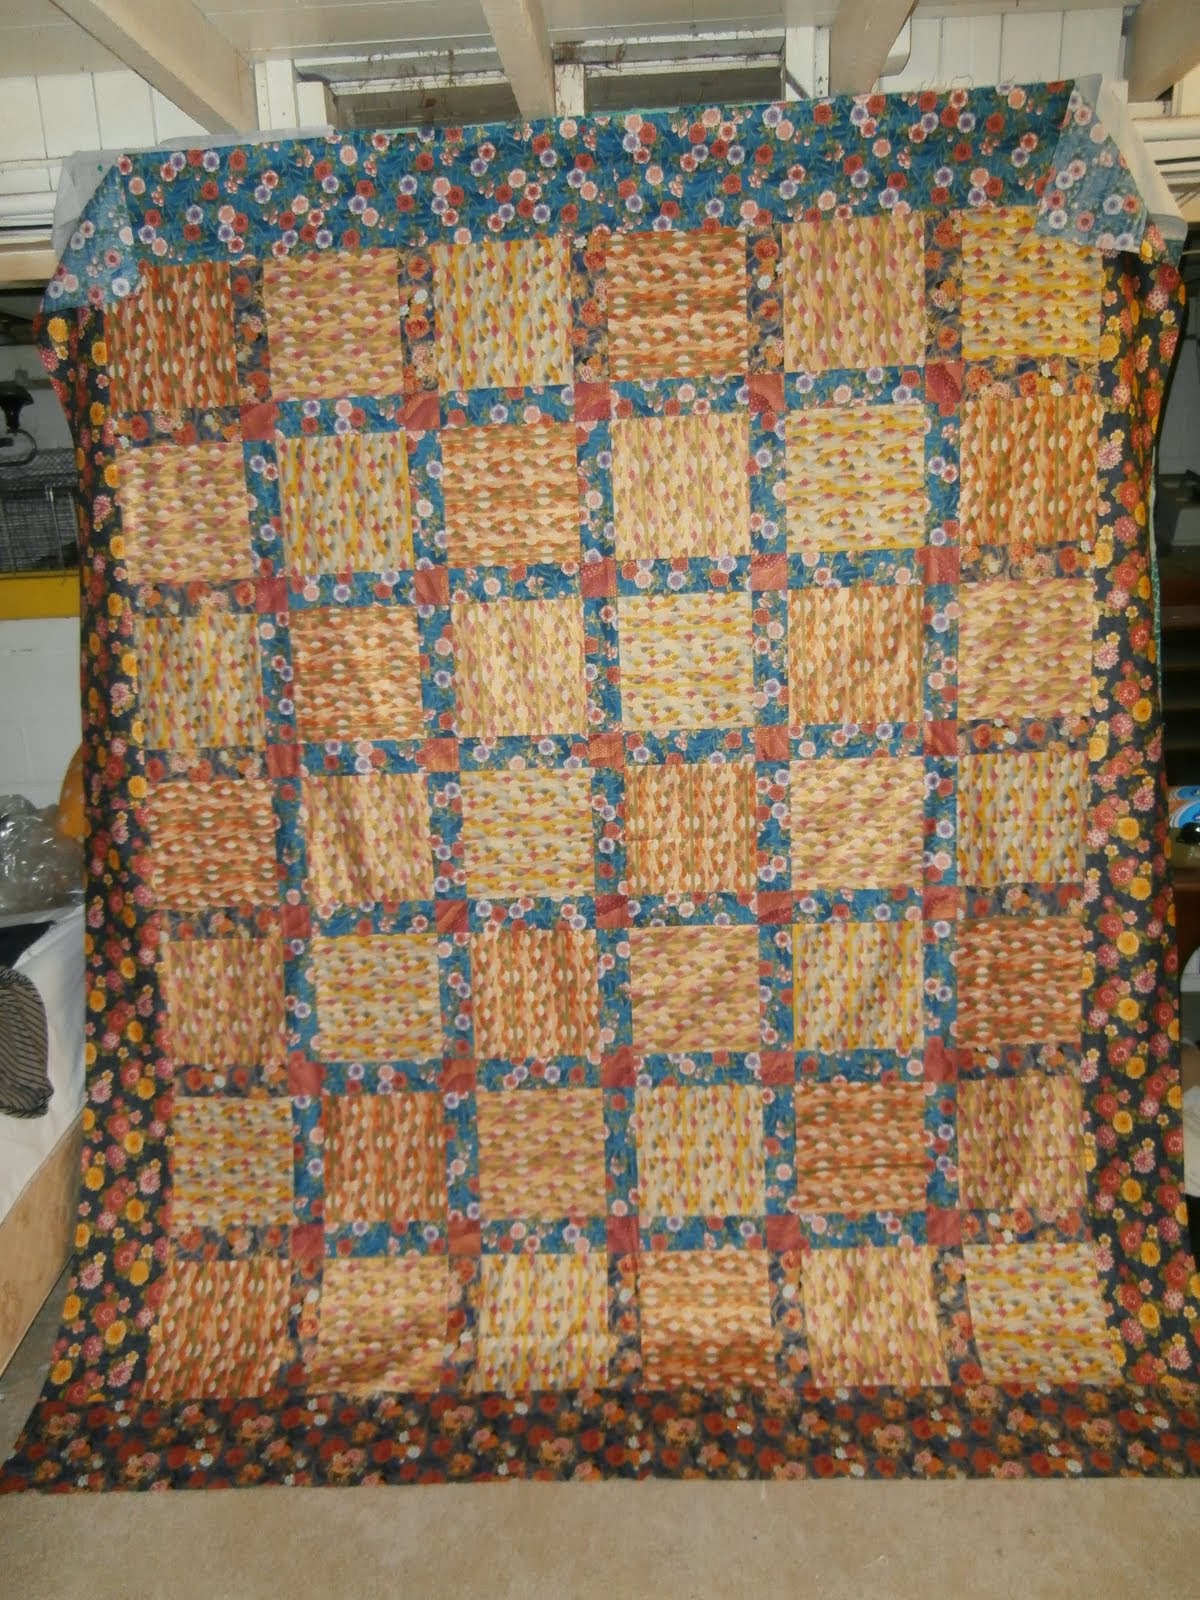
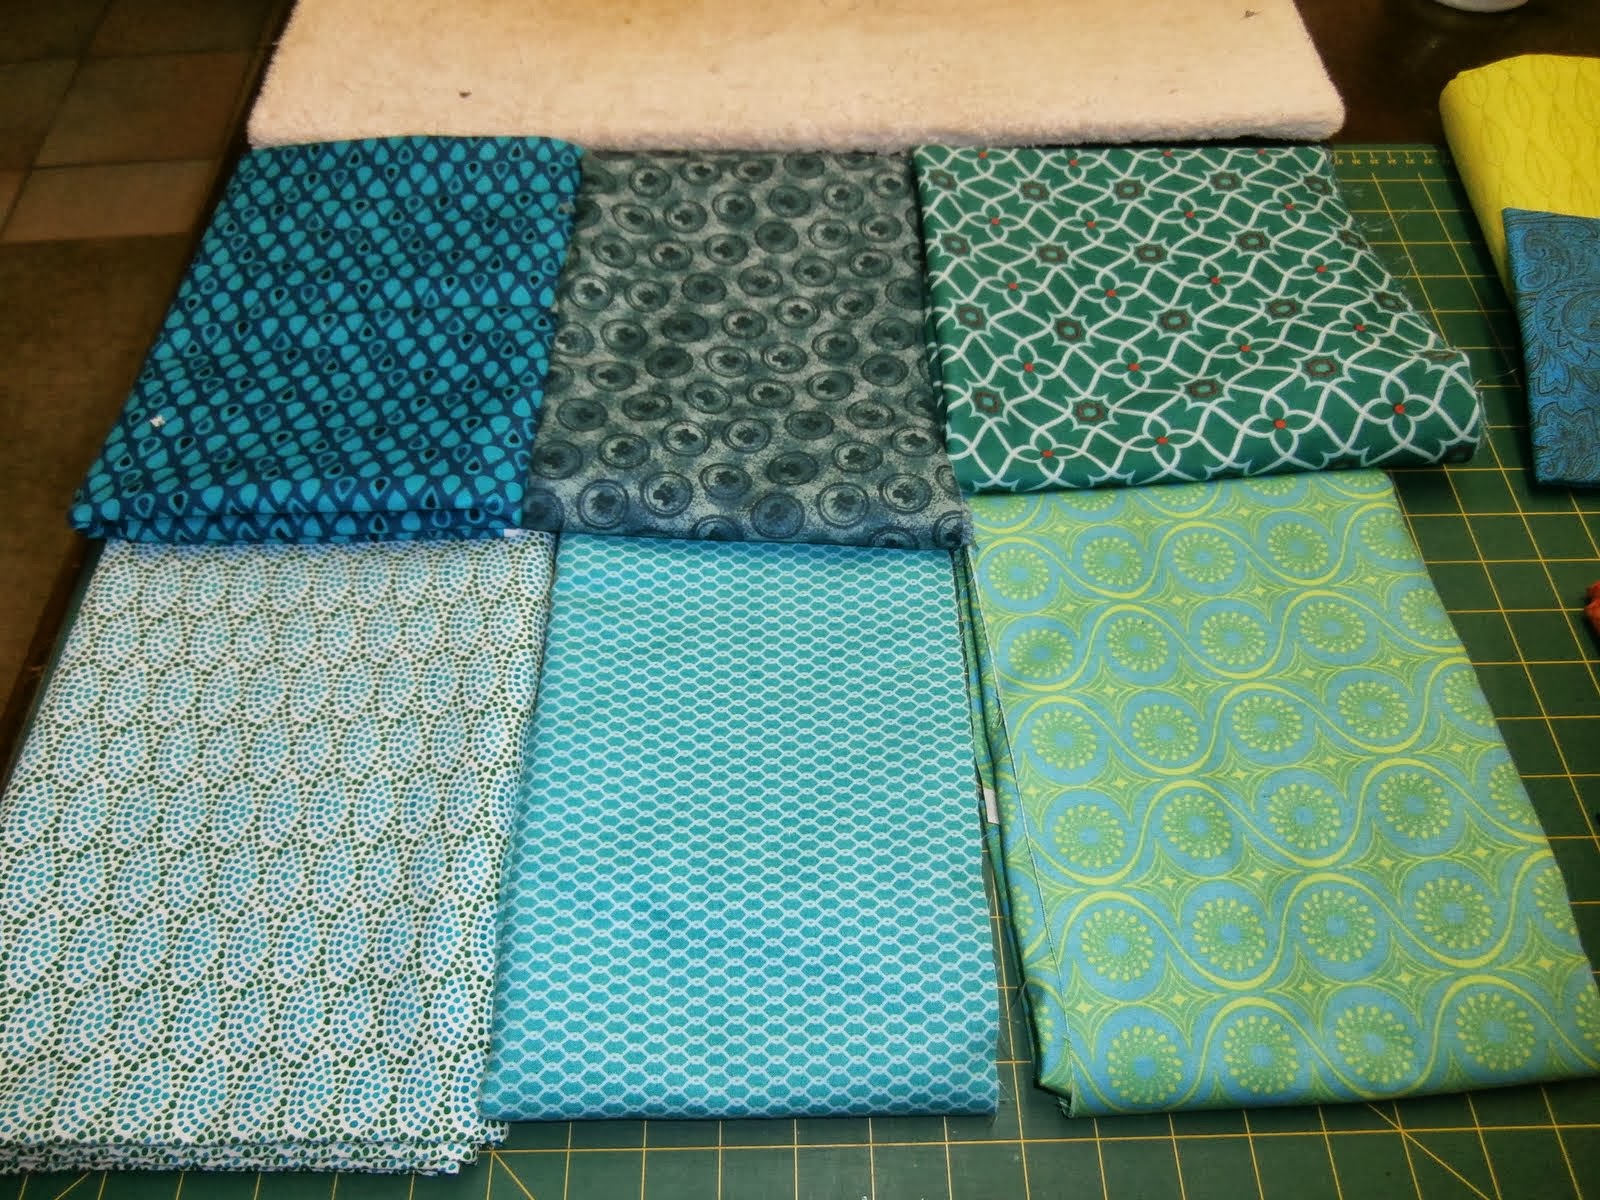
The colours don't look as nice in the photo as they do in real life. The back is made from coordinated Japanese fabrics, which all have gold bling. I had to use different combinations of fabric in the borders, as I really didn't want to buy any more fabric for the back.


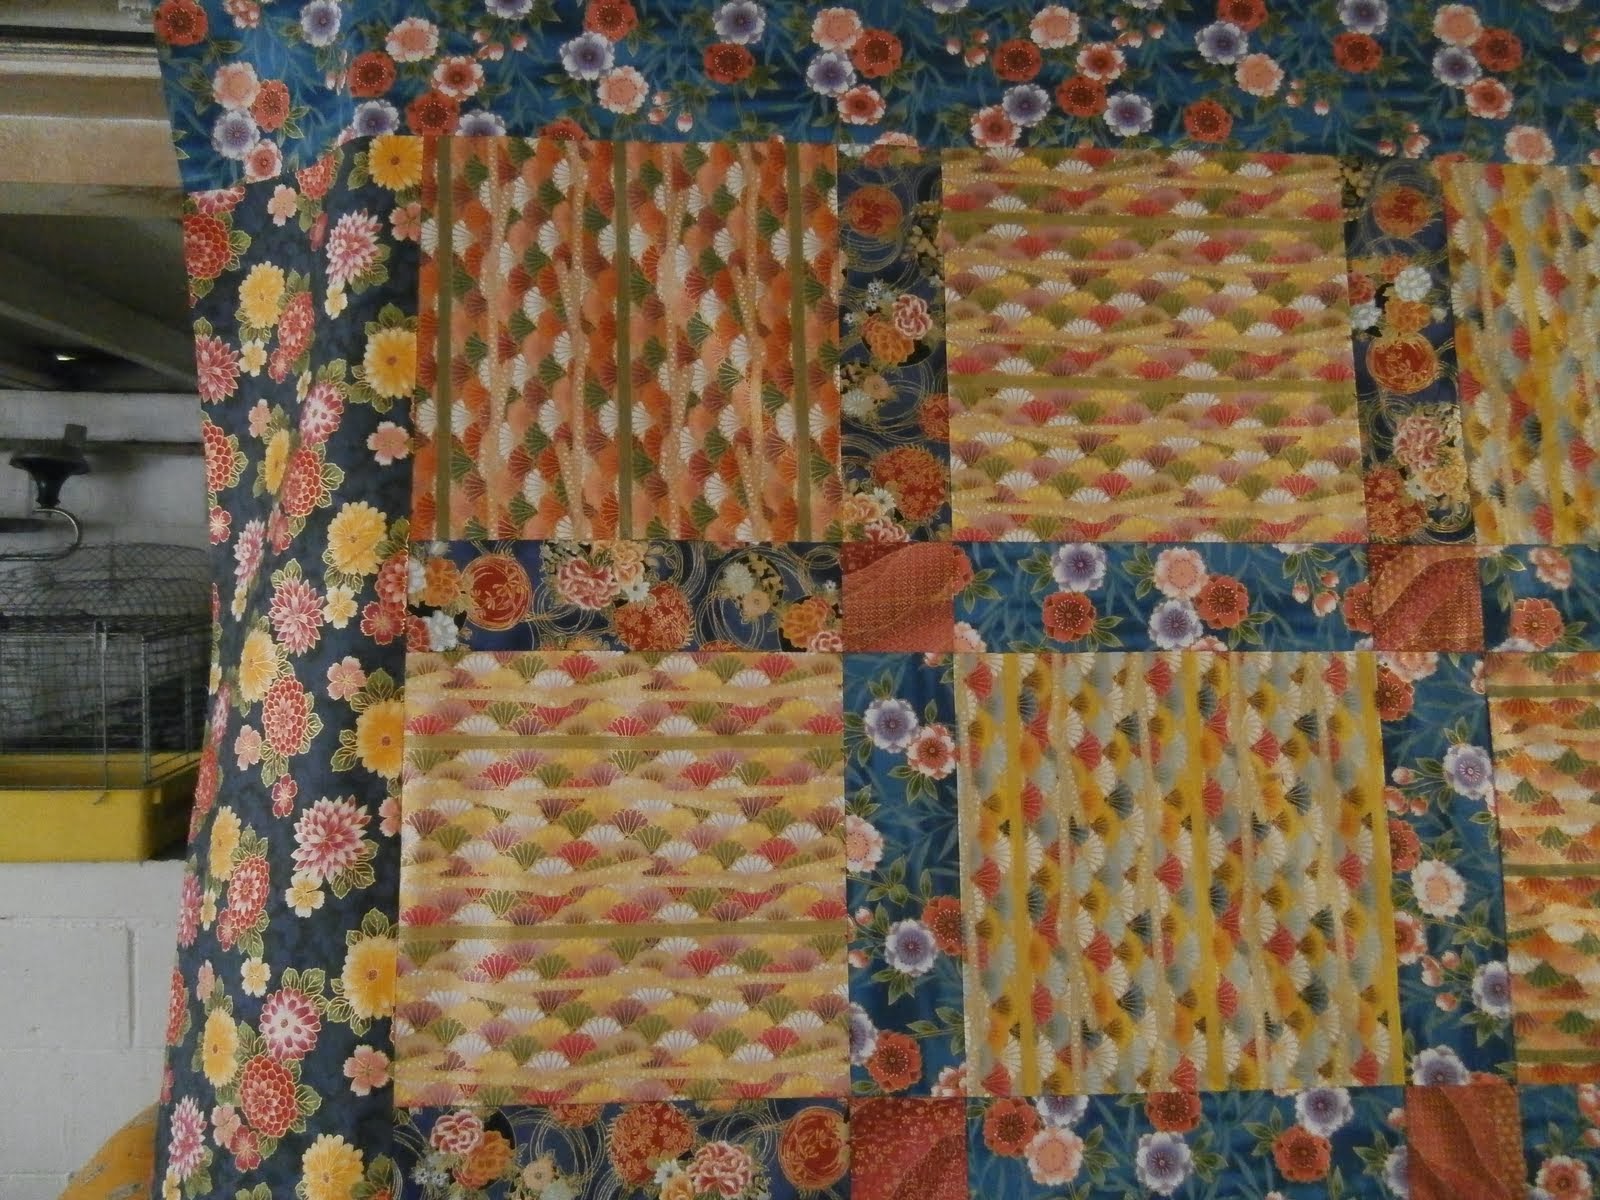
You can see the colours of the back, with teal sashing in the middle of the back, but possibly not the gold bling. I'm looking forward to quilting this one, possibly using Angela Walters' peacock feather design around each eye.


Here is an eye in close up - displaying my not very smooth needleturn. I'm linking up to WIP Wednesday here.

http://www.freshlypieced.com/2013/12/wip-wednesday-lotsa-tops.html


Sunday 17 November 2013

47 hours

I'm heading off to Adelaide on Friday, to see my siblings. My nephew asked for a quilt for his sister's and his new dog, so I thought I'd whip something up. I had three orphan blocks from my niece's peacock quilt, so started off with those at 6.30 on Friday night. That night I made four "made fabric" blocks. They were really ugly and didn't work with the aqua 16 patch blocks. That wore me out, so I gave up for the night.


Inspiration hit the next day. Cut them up and use them for star points. I was off and running. After auditioning fabric from my stash, I decided to use a bright yellow/gold fabric for the background, as the stars were really ugly. At least the yellow was a distraction. The fabric on two sides of the quilt is flannelette - a fat quarters worth. All I had.


The back used the last remaining orphan block and I dragged out every bit of kiddie fabric in my stash, that I knew I wouldn't use for anything else. Turquoise and baby blue do not sit well together. Oh well, it's a dog quilt and it's only the back. The ugly back took me longer than the ugly front to piece. Go figure?

On Saturday afternoon, I basted the quilt using an old woollen blanket for the batting (the blue and cream thing above, which had to be sewn together again as it had torn). I SID one of the stars on the front, then finished quilting it today.


I quilted meandering flowers for Daisy, my niece's and nephew's dog, and included her name.


I quilted continuous curves in the 16 patch blocks.

Trimmed and ready for the binding.


The binding fabric was used as part of a block in my nephew's tumbling block quilt.


This quilt might be a bit fugly, but it contains fabric from both my niece's and nephew's quilts, so links Daisy's quilt with theirs. It finished at 53 x 36 inches, a good sized dog quilt. Now to take it to Adelaide in the hand luggage!


The front


the back - trust me, the colours look worse in real life.


the binding.


All in all, I finished the quilt at 5.30 pm on Sunday. The fastest ever for me. Now back to my niece' quilt.


Friday 1 November 2013

Bloggers quilt festival - double spiderweb

I made this quilt over four or five months this year and am entering it in the scrappy quilt section of Amy's quilt festival. http://amyscreativeside.com/2013/10/25/bloggers-quilt-festival-scrappy-quilts/. I have been buying other peoples scraps for earlier quilts but then saw a quilt with pieced kites some where in blog land.

It obsessed me. I took a month or so deciding on the pattern construction and then cut multiple strips from every fabric I had. They were all left hanging on coat hangers so I could decide what to put where. The construction took quite a while, particularly the pieced kites and I couldn't have finished the layout without a design board.

I have shown this quilt before but never took a finished picture. I bound it a couple of months ago and was using it even before I finished the quilting! Here it is, the double spiderweb.

I quilted each web with a web, but quilted each kite with a different quilting design.
The colours of the flannelette backing works well with the front.
Here it is, in it's rightful place. Some might think this is too busy, but I love it. So does my dog?
 I'm also entering Amy's competition to win a Baby Lock Melody, although I don't think it can be shipped to Australia :}  I'd love to have a good machine to be set up just for piecing, and leave my Janome for FMQ.

Sunday 27 October 2013

This has legs!

It seems I didn't take photos when I finished off the background.  Next step is the peacock's body.
First legs drawing

Final leg drawing

Leg fabric

Here they are

All fused raw edge applique

What a handsome boy!  More eyes to come

Sunday 13 October 2013

Sleeping peacock

possible layout of the eyes (these ones are all for the end feathers, and need lots of hand and machine applique yet


Glue the feather base to the feathers

Machine applique (no stabiliser for me!)

Fold in half and trim the sides

and the curve 

and the base - all on the floor


Pull away the glue and trim the inside

all trimmed - please ignore the flipped seams :-(
 And that's it for this weekend.  I have jobs to do.


Saturday 12 October 2013

Slow peacock progress

Here is an update

The tail is together.  Work has started on the eyes

hand and machine appliqued

Nothing to do with the peacock, but my first hand applique from Sarah Filke's Craftsy course

The cushion back

Sunday 6 October 2013

Peacock progression

The top is now underway. This post is picture heavy, as I want to document the steps to make this quilt. Not too many words to get in the way.
Initial sketch


Final sketch

Tail fabrics
Scaled to size

Possible layout (and the peacock's body)

Testing without cutting

Materials - cheap grease proof paper, glue and scissors


Glue strips of grease proof paper together. Fold in half lengthwise, using two fold-up tables to hold the fragile paper. Draw the peacock body and then fabric sections of the tail.....orange lines need to be spaced better - so do the subsequent blue lines.


Much better spacing! Use a sophisticated ruler to draw the lines


Keep going

Turn over to reveal the other half


Trace over the lines from the other side


Open. Check out the imperfect symmetry.


Test for size


Test again


Decide colour layout and number pieces. Cut sections apart and use as patterns for the fabric


Repeat. Change your mind about the starting colour

Pin before rotary cutting. Remember to include the seam allowance


Keep cutting sections apart, cut fabric and sew together. Keep them in order

Slowly getting there.  More to come.