Pages

Wednesday 26 June 2013

Pieced spiderweb kite - simple tutorial

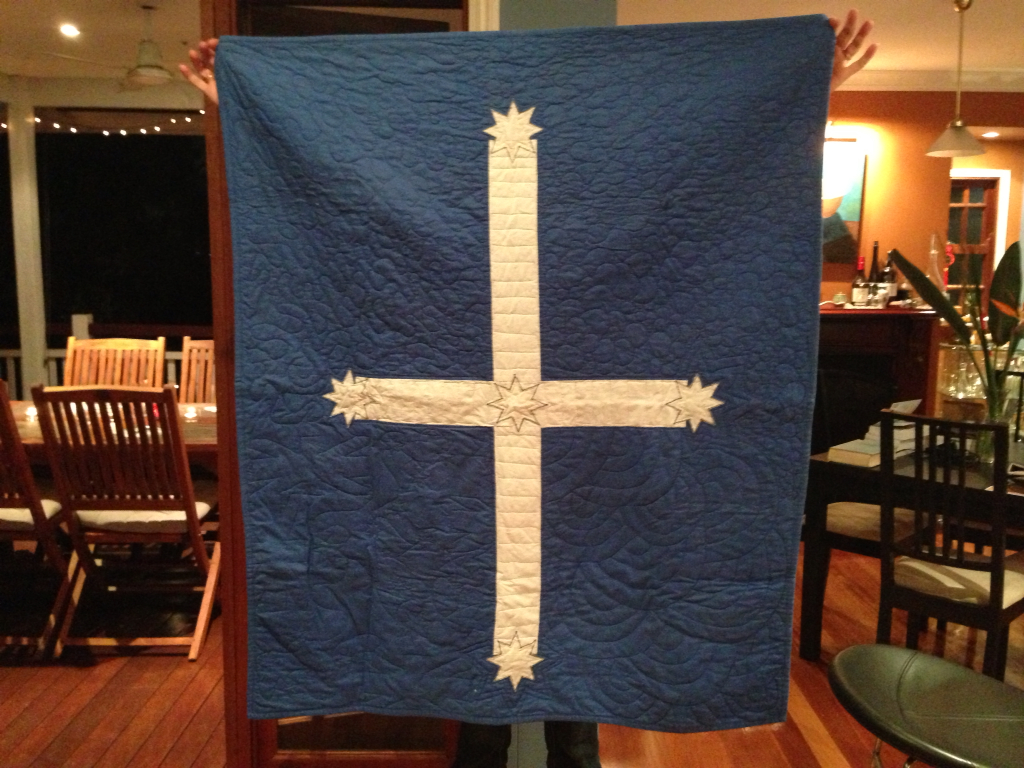
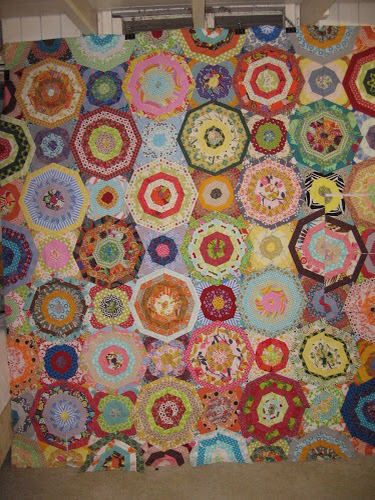
A couple of people have asked how I created the pieced kites for my spiderweb quilt, so I thought I would do a very simple tutorial on how I drafted the pattern.

The quilt's large spiderwebs have been cut from strip sets, while the kites are paper pieced.

To start, get a large piece of lightweight cardboard/heavy paper, that is bigger than the block size you want - I started off with a 12 1/2 inch square, and ended up with a 10 inch finished block.

Draw the size square that you want.


Draw diagonal lines from corner to corner.


Measure along one of the diagonal lines from the centre to the corner. I make a small mark on my ruler, as it is not an exact part of an inch.

Measure the same distance along the outside line of the square and mark it.

From the diagonally opposite corner, measure the same distance along the outside of the square and mark it. Both marks should be equally distant from the middle corner of the large half square triangle, with the marks closest to the middle corner.


Draw a line from each mark to the centre of the square. Congratulations, this is your kite. It is important that the triangle you create on either side of the kite has equal sides, as you will need them to be equal to ensure you can make the large spiderweb triangles using strip sets.

At this stage, you can either draw the 1/4 inch seam allowances all around one half of the kite shape, or cut out the kite, trace it onto paper and then draw a 1/4 inch seam allowance around the shape.

I drew the seam allowance on my square. The lines marked A are the kite shape, while the lines marked B are the seam allowances.

Make sure that you also draw a seam allowance for the centre of the kite. You will only use one side of this kite shape - ie that in the green box.

Cut out one side of the kite, including seam allowances.


This is the template you will need to use to create the pieced kites.
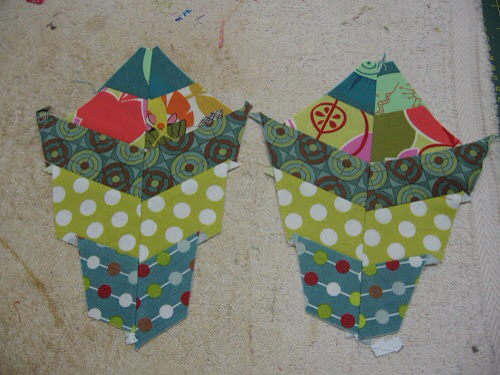
I traced this onto a plain piece of paper twice, then turned it over and traced the reverse side twice again, so I had two left and right halves.

Save this one and make copies of it to use as the paper piecing templates. Each one will need to be cut apart (4 template on the photo above). I drew the lines at the point of each corner to give me a starting point for the first strip of fabric in the kites. You will need four left facing half kites and four right facing half kites for each full kite spiderweb, so make sure you make lots of copies.

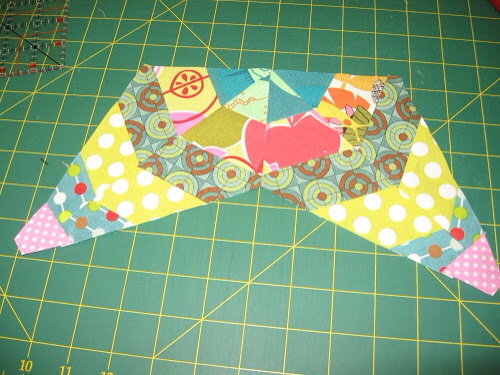
For the large webs, I used a 45 degree ruler to cut from strip sets that were made the same width as the length of the big triangle from the block template I drew above. I only have a 90 degree ruler with two corners that are 45 degrees, but I imagine any ruler that you use to make kaleidoscope blocks would also work well. The 45 degree angle is the important one.

The width of the strip set should be as wide as the triangle is high, plus 1/4 inch seam allowance.

If anyone is interested, I'll show how to cut/sew the fabric. Let me know. As this is a really quick tutorial, please let me know if the steps aren't clear and I'll update the information.


Monday 17 June 2013

Beagle quilts

After Australia Day last year, a shop was giving away their excess australian car flags. I grabbed quite a few of them and drove down to the dog park with 16 flags flapping in the breeze, as a joke for a friend who poo poos the event. DH was convinced I would be pulled over by the police for causing a traffic hazard.

After some hilarity at the park, I drove home, pondering what to do with the flags. Make a quilt for the non-lovers of the Aussie flag! So I squared up the Made in Taiwan flags and sewed them together with the intent to end up with a rectangle of slippery flagness.. I then had to come up with something less slippery for the back. But of course, it had to be a eureka flag. I sewed together a semblance of the anti establishment Aussie flag and then quilted it and bound it.


Here it is in all it's stinkyness, having been slept on by two smelly beagles. Holding it up for the photos, I nearly collapsed from the odour de doge.


I participated in the 2012 FMQ challenge and had made a quilt from a layer cake, supplemented by white fabric. I decided to finish quilting the remaining blocks and giving it to the beagle owners so their dogs would have one each. I suspect it's not very warm as sections of it are quilted so heavily. So I pulled my finger out on Sunday and quilted the borders and bound it. Into the washing machine and it is now covering a snoring beagle.


Here it is, being coveted by my dog.

And used by its new owner.


Friday 14 June 2013

Stash sorting

My stash is now tidy.  I've spent 2 1/2 hours folding it and sorting it into colours.  I know many of you have huge stashes, but mine is small.
Yes, that is a shoebox that my blue fabric is in.  These two photos are my entire stash.  Not even one large plastic storage box.   I used most of these for my double spiderweb quilt.  I am tired now.  I don't know how people with large stashes manage refolding it all.  My shoulder is sore.  Goodnight.


TGIFF

>

The spiderweb quilt is in the process of being quilted, but I'm not all that happy with my quilting - I haven't done any for some weeks and am having trouble moving the quilt, even though my machine is flat in a table, I use a supreme slider and I had gloves on. I think the flannelette backing might be helping it to stick.

Anyway, I decided to make a cushion for the sofa for when I'm using the quilt when it gets cold soon. I made the June lemoyne star block on the Craftsy 2013 block of the month. It is a 19 inch block, so makes a good sized cushion.

I finished stitching on the binding on the train on the way home. My star points aren't perfect, but that should go with the quilt.

Im linking up with TGIF friday at hhttp://quiltmatters.blogspot.ca/2013/06/tgiff-hard-core.html
The back, with the quilt being quilted


Sunday 9 June 2013

Not quite a finish and not quite Friday

This weekend is a long one, thanks to the Queen's birthday (which isn't actually in June).In between getting ready for people to come over for dinner on Saturday, I finally sewed all the blocks together, completing the last one about half an hour before they arrived. The piecing ended up being pretty wonky, given the number of angles and all the bulky seams. There are over 2,500 pieces in this quit, which currently measures 73 x 84 inches. Not big enough for a bed, but plenty big enough for the sofa in the coming winter. I'm using wool batting and flannelette for the back, to make sure its nice and warm.Today, I sewed the backing together and spray basted the quilt - using 505 basing spray which I bought when I went to a little quilt show a couple of weeks ago. I have tried using the Birch basting spray several times and have always been disappointed, having to pin baste the quilt top.The 505 worked really well and today, I stitched in the ditch of each of the blocks. I'm linking up to http://richardquilts.blogspot.com as I've finished the top, basting and SID!I didn't want to put a border on this baby - it would look too organised - so i sewed a scant 1/4ish around the edges of the quilt. This is in an attempt to stop crazy bias edge distortions when I quilt.

Colour detail

More colour
I wasn't sure about this combination, but now I like it

For some reason, my camera doesn't like to take clear pictures of this quilt, and distorts the colours - maybe there are so many it gets confused. The colours in the blocks above are reasonably true to life.Any suggestions on how to quilt this one, now I have done the utility stitching? I was thinking of spiderwebs, but that might be a little obvious.


Wednesday 5 June 2013

So close, and yet so far

Linking up with WIP Wednesday at http://www.freshlypieced.com/2013/06/wip-wednesday-chevron-love.html. Tonight, the last two kites were pieced!


Most of the spiderweb quilt top is now in one piece, other than the bottom row and right hand side column of the blocks.


This started as planned geometric piecing, but has ended up being crazy geometric. I can't wait to get the top finished, quilted and in use. I am very happy with this top, even the mismatching seams, as it is bright and energetic.